Wednesday, September 19, 2012

Experimental Whole Wheat Noodles with a White Yogurt Sauce


 Hi everyone!
So if anyone has read my last two blog post you will know that I just got back to school and moved into a tiny studio apartment. To emphasize that point please refer to the picture of my tiny kitchen. If I keep the fridge door closed I can just open the oven door and same with the fridge door if I keep the oven closed! I have two pots, a wok, and 3 frying pans.  slowly but surely it is becoming a real kitchen!


So last night I came home and had a hankering for noodles but I didn't have any sauce. oh darn, guess that means I have to make my own! =D


My dad gave me moms old miracle blades!
WARNING: This sauce was highly experimental, please do some experimentation of your own to achieve the sauce you desire.

On a side note look what my parents gave me to make my kitchen...
<----------more "kitcheny".


 Ingredients!


>noodles of your choice. (3/4 cup of the above was 200 cal.)
>Plain yogurt
>Some sort of dry salad dressing mix (I got the above in Germany, but your local market carries it too haha)

OPTIONAL *
(*really it is all optional)

>1 tomato (optional)
> diced garlic
>salt and pepper to taste
> olive oil or butter.

LET'S GET STARTED!

1. Bring your noodles to a boil. (add a pinch of salt for taste while it boils)

2. while your pasta is going to town for the next 15 or so minutes (I like mine al dente, Ie: slightly chewy if you like mushy pasta and are over 6 and under 76...I say ew)
Measure out your yogurt. I used about 3/4 cup, but I also don't like a lot of sauce so measure to your preference.


3. Start to heat the yogurt  at a low heat adding pepper and garlic.
 (I wish I had, had cheese to add.)


4. As the yogurt starts to gurgle and boil a bit you can  slowly stir in the salad mix of your choice. I chose Italian. Now I did not measure for this and I do not think you should either. Everyone likes it weaker or stronger so add and taste and add more until you are satisfied.


Dice sliced and texting! :)
5 Dice your tomato. Since I was cooking for me alone I diced half and ate the other half while cooking.


NOTE: I recommend using a serrated blade like the one pictured below it will cut the soft flesh of the tomato more easily.

6. You can either add the tomatos afterwards or add it straight to the sauce. I added mine to the sauce because I personally believe that warmth brings out the flavor.

7. let the sauce sit off to a simmer. So it can thicken a bit. Mine did not thicken as much as I would have liked. try adding a bit of butter for both flavor and thickening. (as well as any other thickening agents depending on how you like it. (ie: flour)

7. DON'T FORGET ABOUT THOSE NOODLES!

8. Once you have your noodles strained you can either toss them with olive oil to keep them from sticking or add them straight to the sauce. I also added fresh spinach to mine!
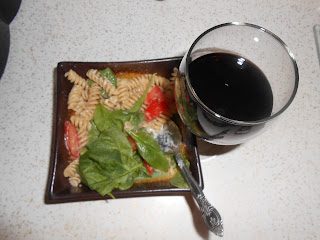
Don't forget the ever important wine...or grape juice for those of you underage. ;)
and vwala!

Enjoy! And please add comments! I urge you to experiment with your food!
 Did you do anything differently? Tell me about it!


Monday, September 10, 2012

I HAVE RETURNED!!!

What was a world without internet!?

Hello everyone!
Today a wonderful gentleman from my internet provider came and got my wee little apartment all hooked up, it is finally a home! The poor man was probably afraid I would pop of excitement as I watched him mess with all the gadgets, he was even kind enough to set up my router for me!

This is wonderful for a few reasons:

1. I am completely and utterly addicted to social media and breaking news stories.
2. Hey, I am a student and internet is sort of a priority. (yay to no more hikes to the library)
3. I can start updating this sad little bog again!

So, I have some breaking news of my own. (hold onto your pants)

I am taking recipe requests! What is a recipe you really love, want to try, or just think sounds interesting. It could even be one you made up! I am going to choose five to make and feature on my blog!

(Earth shattering breaking news, I know)


Also I have a Facebook page! 


Check it out:https: Juke Kitchen Creations Facebook!


Post soon, 

Juke

Wednesday, September 5, 2012

More to Come

Hey everybody who may or may not (most likely not) be reading my blog.
I  am sorry for the long extended absence. August was full of much needed vacation, huge family reunion/ wedding, and the start of school. That last part included moving from Colorado back to Washington state and moving into a new apartment. I seriously don't even have internet yet at my humble tiny, tiny, very tiny studio.
 I will be reconnected on Monday!

Posts soon to come, invite your friends!

- Chelsea May

Tuesday, July 31, 2012

Fresh Food Storage and Cleaning Tips

Hi'ya!


You know what I love about summer? All the freshness! Fresh fruits, veggies, heck even the meat seems fresher somehow.


Today I went grocery shopping and bought a whole bunch of fresh veggies and fruit. Now, as someone who grew up on a little self sustaining farm I am a big advocate of making sure your fruits and vegetables are clean.

When it comes to things like bananas, grapefruit, or kiwi I don't worry about it so much, as I am not exactly eating the skin of those fruits.

CLEANING
WHAT I DO
 Many people use fancy washes and what not. Thanks to my dad thinking it a miracle liquid, I use vinegar.

1. Grab a large bowl, plastic container or as I often do scrub out your sink and plug it.

2. begin filling it with water (lukewarm) and depending on the amount of fruit to be washed as 1/2 - 1 cup of vinegar.

3. Add the fruit. I like to separate smaller fruit like berries or even grape tomatos into strainers.

4. Let the fruit soak for 10-15 minutes. I use this time to clean.

5. rinse and store the fruit.

STORAGE
WHAT I DO

With the apples I simply dried and put in the fruit bowl.
I swear there are apples under all the yummy Kiwi. 
When I was young my Nonnie (AKA: Grandma) Taught me that putting a paper towel in the bag with the lettuce helps the lettuce stay fresh and crisp longer. I use this same method with berries. 


I fold a paper towel to match the container and ... then I put the fruit in.

And cover it with another towel on top (optional I just like to for extra moisture control)

  • When it comes to veggies like celery and carrots I store them in water. I got this idea from my university cafeteria salad bar. They always stored the celery in water so I figured why not. Let me tell you, my celery stays fresher longer.
1. With the celery I cut off the bottom and tops.


I like to clean and keep the top leafy part of the celery to add to soups! mhmmm yum!


2. Cut the celery into halves and throw them to clean.

3. Fill a storage container of appropriate size half way with cold water. 
4. When the celery is done cleaning just plop it in the container and done. 

1. First I peel and cut the carrots length wise. 

2. Really that is all  copy #3 above and add the carrots. 

In the end you will have containers of goodness!


I hope this is helpful and if you have any tips of your own feel free to put them in the comments! 

Monday, July 30, 2012

Yogurt Lime Panko Chicken Tenders.


To be more exact my experimental dinner was Yogurt lime dill panko crusted chicken tenders on a bed of spinach and arugula with sesame cous cous.

My fridge was full if limes that simply NEEDED to be used so the next few meals will probably involve lime or lemon of some sort. 

Now before you freak out that this recipe involves yogurt, let me explain.  I used Plain non-fat greek yogurt which I use as if it is sour cream. Seriously, throw a dollop in soup you won’t notice the difference. Yum and better on the waistline with all those active bacteria working away.

Ok on to the recipe!


NOTE: THIS RECIPE IS A SINGLE SERVING
(As I mainly cook only for myself I make personal meals but don’t be afraid to make it family size)

Ingredients Needed
·      Panko Bread crumbs (I use a quarter of the recommended serving)
·      Dill (I used fresh dill from my garden but feel free to use dry)
·      ½ cup Plain non-fat yogurt (greek is desirable)
·      1 fresh lime
·      Boneless skinless chicken tenders ( I use 2 in my personal meals)
·      1/3 cup Cous cous and 1 cup water
·      ½ TSP Sesame oil
·      1 cup Raw/fresh spinach  (not gonna lie I just grab a handful)
·      1 cup Raw/fresh arugula  (ditto)

1.     Pre-heat your oven to 400 degrees
2.     Line a baking tray with tin foil and spray it with cooking spray.
3.     Get out two saucers or plates and put the breadcrumbs in one.
4.     In the other grate lime zest with a small zest grater.
5.     To the zest mix yogurt, the juice of the lime, and the dill plus pepper to taste. (I don’t usually use salt but feel free)
6.      Smother both tenders in the yogurt mixture and cover them in the panko breadcrumbs.
7.     Bake in the oven for 25-35 minutes (depends on elevation)
8.     Prepare a plate with spinach and arugula.
9.     When there is about 10 minutes left on the chicken start a cup of water boiling with ½ TSP sesame oil.
10. Follow the directions on the box for the cous cous.

11.   When the tenders are done lay them on the bed of greens and scoop the finished and fluffed cous cous on the side.


ENJOY!!!!

Sunday, July 29, 2012

Single Serve Chocolate Muffin- less than 200 Cal.


I swear I am not a muffin-obsessed fanatic.

But for a few weeks my friend and I totally were obsessed!

 In fact we were obsessed with one muffin in particular. Sally’s Baking Addiction, "Skinny" chocolate chip muffin.  

Well I did some math and figured out that these muffins were roughly 210 calories. So I wondered to myself today, Can I get my chocolate fix, in a muffin, in less than 200 calories?  Well I refused to use “fake chocolate chips “  you know the kind, less sugar, less actual chocolate, and a sin to cocoa.

So I stood in the middle of the kitchen and looked around what could I use? Then it hit me. Cocoa! Hershey’s powdered baking Cocoa .

So I wouldn’t have the gooey wonderfulness of melty semi-sweet chocolate chips, but I would have chocolate!

1 Tablespoon of Cocoa powder has about 10 calories, so perfect!

Let the experimentation begin!

So I followed Sally’s recipe pretty closely minus the powder.

Dry Ingredients
1 TBSP Cocoa powder
3 TBSP flour (I used whole wheat)
1 TBSP zero calorie sweetener
¼ TSP baking powder

Wet Ingredients
1 TBSP light butter  (I used smart balance light)
1.5 TBSP milk (I used non-fat and you can use soy, almond, or rice too)
½ TSP vanilla extract

1.     Preheat the oven to 330 degrees
2.     Line or spray a muffin tin. (ONLY ONE SLOT!)
3.     Stir the dry ingredients together
4.     Add the wet ingredients and stir but not to much! We don’t want a tough muffin.  ;)
5.     Bake for 17-20 minutes , check it with a tooth pick (at my elevation I went the full 20)
6.     ENJOY!!!!


If you don’t care about calories jazz this up with some chopped up pecans, or substitute half of the butter with Peanut butter! Even add chocolate chips for a chocolaty explosion.  Or…oh my gosh, fruit like halved cherries!

Anyway, enjoy the recipe and don’t forget to check out Sally’s baking addiction. Pretty awesome stuff. 

Nutritional Info thanks to Myfitnesspal.com


Saturday, July 28, 2012

0 Fat Low Calorie Banana Berry muffins.


The other day I was craving muffins like a madman, which is amusing as I just started liking muffins this year.  You see I find most store bought muffins to be exceedingly over-sweetened.

Story time.

In general I am not a fan of overly sweet things. Really, when it comes to food I will eat almost anything except papaya and pineapple. They are too sweet. (plus pineapples texture is creepy)

Then you might say but wait! You love chocolate so what gives? I like, ok I LOVE dark chocolate, I like strong coffee, and to be honest I freaking love a good dill pickle.  (Sweet pickles are an abomination)
I will take rich flavors over sweet flavors any day.

So anyway back to the point!

 I wanted a muffin.

Well earlier in the month I had pinned a recipe that would just about do. However. I didn’t have all the necessary ingredients, so what is a girl to do?

Experiment!!!

((Here is the original recipe by Sally's Baking Addiction
http://sallysbakingaddiction.com/2012/04/01/strawberry-banana-muffins/))


VERY BERRY BANANA MUFFINS

·      PREHEAT OVEN TO 350

·      Spray or line muffin tin


Dry ingredients
1/4 cup –whole wheat flour (you can use all purpose if desired)
¼ cup – light packed brown sugar
¼ cup -0 cal. Sweetener
½ teaspoon cinnamon
½ teaspoon baking soda

Wet ingredients
ONE Whipped egg white
1-teaspoon vanilla extract
¼ cup plain greek yogurt (I used Fage non fat) (does not have to be greek)
½ of a medium banana mashed (thinly slice the other half)
I tbsp. milk

FRUIT (really it is all optional but don't beboring!)
Other half of the banana thinly sliced
Strawberries (optional)
Blueberries (optional)
½ of a cored apple sliced and diced thin and mashed as much as you want. (Optional)
(really it is all optional but don't be boring!)


1.    Stir the dry ingredients together
2.    Add the mashed banana and gently stir it in (not too much)
3.    Stir in egg, vanilla, yogurt, and milk
4.    Fold in desired fruit (again making sure not to over mix)

5.     Careful not to overfill these muffins will seem smaller but are moist and dense.
6.    Put in the oven for 15-20 minutes (at my high elevation I actually went 22 minutes)


ENJOY

Best of all...
ONLY 87 Calories per muffin! 
obviously results vary on fruit used and whether you made six big dense muffins or 12 smaller ones.